|
This is unreleased documentation for Fleet Next. |
Installation Details
Fleet can be installed in two modes: single-cluster and multi-cluster.
-
Single-cluster install: Recommended for getting started. This mode runs both the Fleet manager and agent on the same cluster.
-
Multi-cluster install: Used to manage multiple downstream clusters from a central manager.
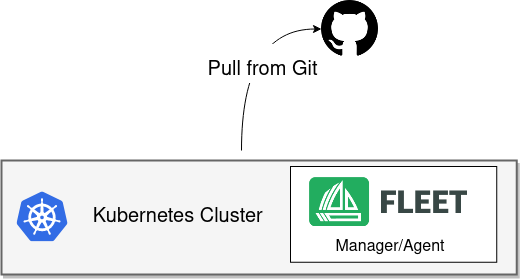
In the single-cluster setup, the same cluster runs both the Fleet manager and the Fleet agent. The cluster connects directly to the Git server to deploy resources locally. This is a simple, production-supported setup ideal for development, testing, and small-scale use.
Prerequisites
Helm 3
Fleet is distributed as a Helm chart. Helm 3 is a client-only CLI with no server-side component. To install Helm 3, follow the official instructions at Helm installation guide.
Default Installation
Install the following Helm charts to set up Fleet.
|
Fleet in Rancher Rancher includes separate Helm charts for Fleet and uses a different repository. |
-
Add the Fleet Helm repository
helm repo add fleet https://rancher.github.io/fleet-helm-charts/ -
Install the Fleet
CustomResourceDefinitions`helm -n cattle-fleet-system install --create-namespace --wait fleet-crd \ fleet/fleet-crd -
Install the Fleet controllers
helm -n cattle-fleet-system install --create-namespace --wait fleet \
    fleet/fleet
Verify the installation
Run the following commands to verify that the Fleet controller pods are running:
kubectl -n cattle-fleet-system logs -l app=fleet-controller
kubectl -n cattle-fleet-system get pods -l app=fleet-controller
Example output:
NAME                                READY   STATUS    RESTARTS   AGE
fleet-controller-64f49d756b-n57wq   1/1     Running   0          3m21s
You can now register Git repositories in the fleet-local namespace to start deploying resources.
Tweaking Your Fleet Installation
Controller and Agent Replicas
Starting with Fleet v0.13, the Helm chart exposes replica count settings for each controller type and the agent:
-
controller.replicas: Controlsfleet-controllerpods managing bundles, clusters, and groups. -
gitjob.replicas: Controls GitOpsGitReporeconciliation. -
helmops.replicas: Controls the experimental HelmOps controller. -
agent.replicas: Controls the Fleet agent.
Each defaults to one replica.
Enabling imagescan
The imagescan feature is disabled by default, meaning that:
-
non-empty
imageScansblocks in yourfleet.yamlor equivalent config files will lead to bundle creation errors, visible in your GitRepo’s status. -
the imagescan controller will not run, hence repositories referenced in
imageScanblocks offleet.yamlor equivalent config files will not be monitored for newer images. This also means that image tags referenced in your manifests with annotations such asimage: <image>:<tag> # {"$imagescan": "test-scan"}will not be expanded.
To remedy this, install Fleet with --set imagescan.enabled=true.
Disabling the Local Cluster Agent
By default, Fleet deploys an agent on the management (local) cluster so that it can receive GitOps deployments just like any downstream cluster. If you want to use the management cluster exclusively as a control plane and prevent workloads from being deployed onto it, you can disable the local agent.
When the local agent is disabled:
-
The local
ClusterandClusterGroupresources remain registered. -
The
fleet-agentis not deployed on the management cluster. If an agent is already running, it will be removed. -
The local cluster will not receive any bundle deployments.
To disable the local agent at installation time:
helm -n cattle-fleet-system install --create-namespace --wait fleet fleet/fleet \
  --set bootstrap.localAgentDisabled=true
To disable it on an existing installation, upgrade the chart:
helm -n cattle-fleet-system upgrade fleet fleet/fleet \
  --set bootstrap.localAgentDisabled=true
To re-enable the local agent, set the value back to false (the default):
helm -n cattle-fleet-system upgrade fleet fleet/fleet \
  --set bootstrap.localAgentDisabled=false
Additional SSH known hosts
When interacting with git repositories through SSH, strict host key checks are enabled by default, meaning that
Fleet will reject SSH connection attempts to hosts for which no known_hosts entry exists.
More information, refer to s strict host key checks.
By default, Fleet installs known_hosts entries for a few widely used git hosting providers.
Host key fingerprints added to the config map are sourced, respectively:
-
from GitHub SSH key fingerpints for Github
-
from SSH known host entries for Gitlab
-
from configure SSH and two step verification for Bitbucket, which also provides a
curlcommand to fetch them inknown_hosts-friendly format:curl https://bitbucket.org/site/ssh -
from Use SSH keys to authenticate for Azure DevOps
However, when using a different git hosting setup, such as private servers hosted by yourself or your company, entries
for those servers can be added to Fleet at installation time using the additionalKnownHosts Helm value, which supports
an array of strings.
Each element of that array would be an additional entry, e.g.:
helm -n cattle-fleet-system install --create-namespace --wait fleet fleet/fleet \
  --set additionalKnownHosts={'ourgitserver.company ssh-rsa <fingerprint>','our-other-git-server.company ssh-ed25519 <fingerprint2>'}
Multi-Controller Installation: Sharding
Deployment
From version 0.10 onward, Fleet supports static sharding. Each shard is defined by a unique shard ID. You can optionally assign a node selector so all controller pods for that shard run on specific nodes.
Install Fleet with the following Helm options:
-
--set shards[$index].id=$shard_id -
--set shards[$index].nodeSelector.$key=$value
Example:
helm -n cattle-fleet-system install --create-namespace --wait fleet fleet/fleet \
  --set shards[0].id=foo \
  --set shards[0].nodeSelector."kubernetes\.io/hostname"=k3d-upstream-server-0 \
  --set shards[1].id=bar \
  --set shards[1].nodeSelector."kubernetes\.io/hostname"=k3d-upstream-server-1 \
  --set shards[2].id=baz \
  --set shards[2].nodeSelector."kubernetes\.io/hostname"=k3d-upstream-server-2
Verify Fleet controllers and GitJob pods:
kubectl -n cattle-fleet-system get pods -l app=fleet-controller \
  -o=custom-columns='Name:.metadata.name,Shard-ID:.metadata.labels.fleet\.cattle\.io/shard-id,Node:spec.nodeName'
Name Shard-ID Node
fleet-controller-b4c469c85-rj2q8 k3d-upstream-server-2
fleet-controller-shard-bar-5f5999958f-nt4bm bar k3d-upstream-server-1
fleet-controller-shard-baz-75c8587898-2wkk9 baz k3d-upstream-server-2
fleet-controller-shard-foo-55478fb9d8-42q2f foo k3d-upstream-server-0Similarly for GitJob pods:
kubectl -n cattle-fleet-system get pods -l app=gitjob \
  -o=custom-columns='Name:.metadata.name,Shard-ID:.metadata.labels.fleet\.cattle\.io/shard-id,Node:spec.nodeName'
How It Works
Each Fleet controller processes resources labeled with its shard ID. The unsharded controller handles all resources without a shard ID.
To deploy a GitRepo to a specific shard, add the label fleet.cattle.io/shard-ref to the resource.
Example:
apiVersion: fleet.cattle.io/v1alpha1
kind: GitRepo
metadata:
  name: sharding-test
  labels:
    fleet.cattle.io/shard-ref: foo
spec:
  repo: https://github.com/rancher/fleet-examples
  paths:
  - single-cluster/helm
A GitRepo with a known shard ID (for example, foo) is processed by that controller.
Unknown shard IDs (for example, boo) are ignored.
To add or remove shards, redeploy Fleet with an updated shard list.
Node Selectors
Fleet charts can be configured to run controllers and agents on specific cluster nodes, using the nodeSelector Helm
value, found at:
* nodeSelector in the fleet chart
* fleetAgent.nodeSelector in the fleet-agent chart
Fleet agents are not affected by sharding; however, controllers may also receive node selectors from sharding configuration.
In case both global and sharded node selectors are provided, both will be applied to Fleet controller deployments. No checks are run for overlaps or conflicting node selectors between both sources.
Git jobs created by the gitOps controller to update workloads from GitRepo resources will inherit the fleet-controller
deployment’s node selectors.
Configuration for Multi-Cluster
|
Downstream clusters in Rancher are automatically registered in Fleet. The setup below applies only to standalone Fleet and is not QA-tested by Rancher. |
|
The installation steps are identical to a single-cluster setup. After installing the Fleet manager, register remote clusters manually. For manager-initiated registration, additional API server details are required. Without them, only agent-initiated registration is possible. |
API Server URL and CA Certificate
The Fleet manager requires access to the Kubernetes API server. Agents use the API server URL and CA certificate to communicate securely.
Obtain these values from your kubeconfig file ($HOME/.kube/config):
apiVersion: v1
clusters:
- cluster:
    certificate-authority-data: LS0tLS1CRUdJTi...
    server: https://example.com:6443
Extract CA Certificate
The certificate-authority-data field is Base64 encoded.
Decode it and save to a file:
base64 -d encoded-file > ca.pemUse this command to extract all CAs:
kubectl config view -o json --raw | jq -r '.clusters[].cluster["certificate-authority-data"]' | base64 -d > ca.pemFor multi-cluster kubeconfigs:
kubectl config view -o json --raw | jq -r '.clusters[] | select(.name=="CLUSTERNAME").cluster["certificate-authority-data"]' | base64 -d > ca.pemExtract API Server
API_SERVER_URL=$(kubectl config view -o json --raw | jq -r '.clusters[] | select(.name=="CLUSTER").cluster["server"]')
API_SERVER_CA="ca.pem"
Validate
Verify the API server URL:
curl -fLk "$API_SERVER_URL/version"Expected output: JSON version info or a 401 Unauthorized error.
Then validate the CA certificate:
curl -fL --cacert "$API_SERVER_CA" "$API_SERVER_URL/version"You should see valid JSON or a 401 Unauthorized message.
If you get an SSL error, the CA file is incorrect.
Example CA file (ca.pem):
-----BEGIN CERTIFICATE-----
MIIBVjCB/qADAgECAgEAMAoGCCqGSM49BAMCMCMxITAfBgNVBAMMGGszcy1zZXJ2
ZXItY2FAMTU5ODM5MDQ0NzAeFw0yMDA4MjUyMTIwNDdaFw0zMDA4MjMyMTIwNDda
...
-----END CERTIFICATE-----
Install for Multi-Cluster
Assume the API server URL is https://example.com:6443 and CA is in ca.pem.
If your API server uses a well-known CA, omit the CA parameter.
API_SERVER_URL="https://example.com:6443"
API_SERVER_CA="ca.pem"
Then install the Fleet charts:
helm repo add fleet https://rancher.github.io/fleet-helm-charts/Install CustomResourceDefinitions:
helm -n cattle-fleet-system install --create-namespace --wait \
    fleet-crd fleet/fleet-crd
Install Fleet controllers:
helm -n cattle-fleet-system install --create-namespace --wait \
    --set apiServerURL="$API_SERVER_URL" \
    --set-file apiServerCA="$API_SERVER_CA" \
    fleet fleet/fleet
Verify
kubectl -n cattle-fleet-system logs -l app=fleet-controller
kubectl -n cattle-fleet-system get pods -l app=fleet-controller
NAME READY STATUS RESTARTS AGE
fleet-controller-64f49d756b-n57wq 1/1 Running 0 3m21sAt this point, the Fleet manager should be ready. You can now register clusters and add Git repositories.